

Receiving Card for LED Displays: An Easy Guide
LED screens may look like a wall of light and motion, but behind every clear picture and color change is a small, unknown hero: the receiving card.
Each LED cabinet has a receiving card that is very important. Its job is to get the picture data from the main controller (also called the sending card) and deliver it to each LED module in the cabinet in the right way. It is like a translator between the brain and the muscles. It makes sure that every pixel lights up at the proper time, in the right color, and at the right brightness.
In a standard LED display setup, you’ll find one sending card controlling the overall content and several receiving cards—usually one per cabinet—handling the local pixel-level execution. Even the greatest LED modules won’t show material accurately if the receiving card isn’t set up right. Receiving cards keep everything in sync and looking sharp, from video walls in stadiums to rental LED panels at concerts.
Receiving Cards in Simple Words
An LED display looks like a huge jigsaw made up of hundreds or thousands of little squares that light up. These squares are called modules. Each square needs to know exactly what section of the picture it should light up in order for the puzzle to show a clear picture or video. That’s where receiving cards come in. They carry the message. They get the whole picture from the transmitting card, which is connected to a computer or media player. Then, they break it into fragments and send each piece to the proper section of the screen. The modules wouldn’t know what to show or where to show it if they didn’t get cards.
You might think of a receiving card as a teacher in a big school. The principal sends out the primary lesson plan, but the teacher is the one who teaches it to their students (a part of the screen). When a teacher is missing or confused, their class falls behind, and you can notice flickering panels, blank boxes, or colors that don’t match. Receiving cards do the hard work to make sure your screen looks correct, even though they are buried behind the LED cabinet.
Novastar Receiving Cards
When it comes to LED control systems, Novastar is the best in the business. Novastar receiving cards are generally the first choice for high-end rental systems, broadcast settings, and fixed installations where visual performance and system stability are non-negotiable. This is because they have strong hardware, comprehensive calibration capabilities, and an unparalleled software environment.
The Novastar lineup is set up to meet a variety of project needs.
- Armor Series (A-Series): Made to be very reliable and have backups. They are great for mission-critical uses like XR stages or stadium LED walls since they have two backup power inputs, can handle a broad range of voltages, and have several status indicators.
- MRV Series: These are the mainstream models like MRV336, MRV412, and MRV216. They support up to 512×384 resolution and integrate smoothly with most Novastar sending cards. They’re commonly used in touring, retail displays, and commercial video walls.
- CA Series (Calibration Available): Made with pixel-level brightness and chroma calibration in mind. These models let you use smart modules and data feedback loops to get the best image quality, which is very crucial in broadcast and studio settings.
It’s important to match the proper model with the intended use case because each series has its own firmware and NovaLCT support needs.
Key Features
Novastar receiving cards stand out not just for their pixel capacity, but also for their intuitive control.
- High refresh rates up to 3840 Hz make sure that the camera doesn’t flicker.
- Grayscale optimization with 18–20bit processing for smoother gradients
- Automatic Module Mapping for quick setup and smart cabinet identification
- Monitoring voltage, temperature, network condition, and scan board health in real time
- 3D and HDR support on hardware that works with it
- Image calibration through adjusting brightness and color point by point
These capabilities work well with Novastar’s environment, giving installers additional control and peace of mind.
Novastar MRV series receiving cards
| Card Model | MRV208-1 | MRV412-N | MRV416-N | MRV532 |
|---|---|---|---|---|
| Load capacity (dots) | 256×256 | 512×512 | 512×512 | 512×512 |
| Number of data groups | 16 | 24 | 32 | 40 |
| Output interface | HUB75E*8 | HUB75E*12 | HUB75E*16 | HUB320F*10 |
| Max. Scanning support | 64 | 64 | 64 | 64 |
| Dynamic Sub-pixel | – | – | – | √ |
| 3D display | √ | √ | √ | √ |
| Pixel brightness chromaticity correction | √ | √ | √ | √ |
| 18bit+ grayscale optimization | – | √ | √ | √ |
| Color Management | – | √ | √ | √ |
| RGB Gamma Independent Adjustment | – | √ | √ | √ |
| Low latency | – | √ | √ | √ |
| Multi-batch Adjustment | √ | √ | √ | √ |
| Temperature and voltage monitoring | √ | √ | √ | √ |
| Redundant backup | √ | √ | √ | √ |
| Dual backup of configuration files | √ | √ | √ | √ |
| Firmware program backup | √ | √ | √ | √ |
| Firmware program readback | √ | √ | √ | √ |
| 90 degree rotation | – | √ | √ | √ |
| Pre-stored images | √ | √ | √ | √ |
| Support 5pin LCD | √ | √ | √ | √ |
| Bit error rate test | √ | √ | √ | √ |
| Mapping | √ | √ | √ | √ |

MRV416-N MRV412-N MRV208-1 MRV532


Novastar Armor series receiving cards
Linsn Receiving Cards
Linsn is a well-known name in LED control systems. People trust it because it works well, is compatible with a wide range of devices, and offers affordable solutions. Linsn’s receiving cards are easy to set up and always decode signals correctly, whether you’re working with inside P2.5 cabinets or large-format outdoor LED walls.
Linsn L202 and RV908 Models
The L202 is Linsn’s newest generation card, built for displays with high resolutions. It can handle cards with up to 256×256 pixels and has superior grayscale processing, so it’s a great choice for HD use. The L202 also has enhanced EMI performance and temperature monitoring, which is important for permanent installations in places where the temperature changes.
Many LED integrators rely on RV908 to get the job done. It can handle pixel loads up to 256×256 and supports 12-bit grayscale. It also has smart modules like temperature sensors, voltage monitoring, and Ethernet loop backup. It doesn’t have the L202’s HDR-level performance optimization, but it’s more than good enough for regular rental and fixed displays, especially when used with Linsn sending cards.
In short, if you care about image quality, select L202 for current LED cabinets and fine-pitch displays. Stick with RV908 because it works with a lot of different modules and gives you solid results.
General Features and Compatibility
Linsn’s receiving cards all focus on being stable and easy to integrate. Some common features are:
- 256×256 maximum pixel load
- 12-bit grayscale support
- Support for RGB data mapping
- Input voltage & temp monitoring
- Cable redundancy via dual Ethernet ports
Linsn receiving cards operate perfectly with BX, CX, and old TS transmitting cards. Because they are so easy to use, they are often utilized in rental stage setups, outdoor LED billboards, and small-pitch video walls.
Linsn may not have all the bells and whistles of Novastar or Colorlight, but if you need a budget-friendly LED system that can quickly and reliably decode, they’re a good choice.
Linsn RV series receiving card
| Card Model | RV998 | RV216B | RV908M32 | RV908H32 |
|---|---|---|---|---|
| Load capacity (dots) | 256X1024 or 512X512 | 256X1024 or 512X512 | 1024X256 | 1024×256 |
| Number of data groups | 16 | 32 | 24 | 24 |
| Output interface | HUB75*8 | HUB75*16 | HUB75*12 | HUB75*12 |
| Max. Scanning support | 32 | 32 | 32 | 32 |
| Configuration file readback | √ | √ | √ | √ |
| Network cable bit error test | √ | √ | √ | √ |
| Pixel brightness chromaticity correction | √ | √ | √ | √ |
| 138 decoding | √ | √ | √ | √ |
| 595 serial decoding | √ | √ | √ | √ |
| High refresh rate and high grayscale | √ | √ | √ | √ |
| RoHs | √ | √ | √ | √ |
| CE-EMC Class B | √ | √ | √ | √ |
RV216B RV320A RV908 H32 RV998


Linsn Mini series receiving card
| Card Model | MINI913K | MINI913A | MINI901 | M8 |
|---|---|---|---|---|
| Load capacity (dots) | 512*512 | 512*512 | / | 512*512 |
| Number of data groups | 32 | 64 | 32 | 32 |
| Single card color space conversion | √ | √ | √ | √ |
| Module Flash chip storage | √ | / | √ | √ |
| Configuration file readback | √ | √ | √ | √ |
| Network cable bit error test | √ | √ | √ | √ |
| High refresh rate and high grayscale | √ | √ | √ | / |
M8 MINI 913A MINI 913K Mini901


Colorlight Receiving Cards
Colorlight has carved itself a significant position in the LED control industry by producing durable, high-performance receiving cards that mix price with advanced capabilities. Their E-Series receiving cards are a common choice for indoor signs, fixed installations, and large-format advertising displays, especially when used with Colorlight sending boxes or cloud-based control systems.
Each E-Series model may handle projects of different sizes:
- E80 is the lightest choice and can handle up to 256×256 pixels. It’s perfect for small to medium-sized indoor LED panels or digital posters where you don’t need a lot of control.
- E120 adds to that by having more bandwidth and a bigger load capacity, making it perfect for regular full-color billboards, retail displays, and event screens.
- The group is led by E320. It can handle up to 512×256 pixels, which makes it good for big outdoor displays that need greater refresh rates and more stable images.
Features
In the E-Series, you’ll find things like
- Monitoring status in real time
- Reporting on temperature and voltage
- Support for backup and redundancy input
- Storage for calibration data (with some modules)
- Works well with Colorlight’s cloud platform and LEDVISION software
You can use these cards in malls, stores, churches, and roadside LED screens. They’re great for places where you require flexible control and low-cost growth. A lot of people choose the E320 for outdoor P6/P10 displays since it has a lot of pixels and works well in all kinds of weather.
Colorlight classical Receiving cards
| Featurer | E120 | E80 | 5A-75E | 5A-75B | E320 |
|---|---|---|---|---|---|
| Loading capacity | 192×1024 | 128×1024 | 256×1024 | 192×1024 | 256×1024 |
| Data interface | HUB75E*12 | HUB75E*8 | HUB75E*16 | HUB75E*8 | HUB320 |
| Data group | 24 | 16 | 32 | 16 | 32 |
| Color depth | 8bit | 8bit | 8bit | 8bit | 8bit |
| Dynamic frame rate | 23.976~120Hz | 23.976~120Hz | 23.976~120Hz | 23.976~120Hz | 23.976~120Hz |
| Calibration accuracy | 8bit | 8bit | 8bit | 8bit | 8bit |
| Low latency | √ | √ | √ | √ | √ |
| Color temperature adjustment | √ | √ | √ | √ | √ |
| Better grayscale at low brightness | √ | √ | √ | √ | √ |
| Automatic Highlight and OSD | √ | √ | √ | √ | √ |
| Loop backup | √ | √ | √ | √ | √ |
| lrregular design | √ | √ | √ | √ | √ |
| Network cable detection | √ | √ | √ | √ | √ |
5A-75B 5A-75E E80 E120 E320


Colorlight K Series Receiving cards
| Feature | K10 | K9+ | K8 | K5+ |
|---|---|---|---|---|
| Loading capacity | 512×512 | 512×512 | 512×384 | 512×384 |
| Data group | 32 | 32 | 32 | 32 |
| Color depth | 8bit/1 0bit/12bit | 8bit/10bit | 8bit/10bit | 8bit |
| Dynamic frame rate | 23.976~240Hz | 23.976~240Hz | 23.976~240Hz | 23.976~120Hz |
| Grayscale refinement | √ | √ | √ | √ |
| Multi-layer calibration | √ | √ | × | × |
| Infi-bit | √ | √ | √ | × |
| Low latency | √ | √ | √ | √ |
| HDR | √ | √ | √ | |
| Color gamut adjustment | √ | √ | √ | √ |
| Automatic 0SD | √ | √ | √ | √ |
| Loop backup | √ | √ | √ | √ |
| Receiving card backup | √ | √ | √ | √ |
| Calibration coefficient backup | √ | × | √ | × |
| Configure parameter backup | √ | × | √ | × |
| lrregular display | √ | √ | √ | √ |
| Smart module | √ | √ | √ | √ |
| Cabinet monitoring | √ | √ | √ | √ |
| Network cable detection | √ | √ | √ | √ |
K8 K9+ K10 K15+


Huidu Receiving Cards
People like Huidu receiving cards because they are easy to use and don’t cost much. This makes them a good choice for modest to medium-sized LED screen projects. Huidu has plug-and-play control options that don’t require a lot of technical knowledge, whether you’re making a church LED wall, a shopfront display, or an interior signage network.
Many people use the HD-R708 as a receiving card from Huidu. It can handle up to 256×256 pixels and works well with both Huidu’s synchronous and asynchronous systems. When used with appropriate modules, it stands out because it can monitor things in real time, back up data quickly, and change the brightness automatically.
It’s great for projects that want to make setup, remote control, and maintenance as straightforward as possible. You can typically find it in LED posters, window displays, school signs, and small rental screens. It works perfectly with Huidu’s control cards and software, such HDPlayer or LED Art, so setting it up only takes a few minutes, even for people who have never done it before.
Huidu R7 series receiving card
Huidu R5 series receiving card
| Model | HD-R500S | HD-R5S | HD-RB6 | HD-R507T |
|---|---|---|---|---|
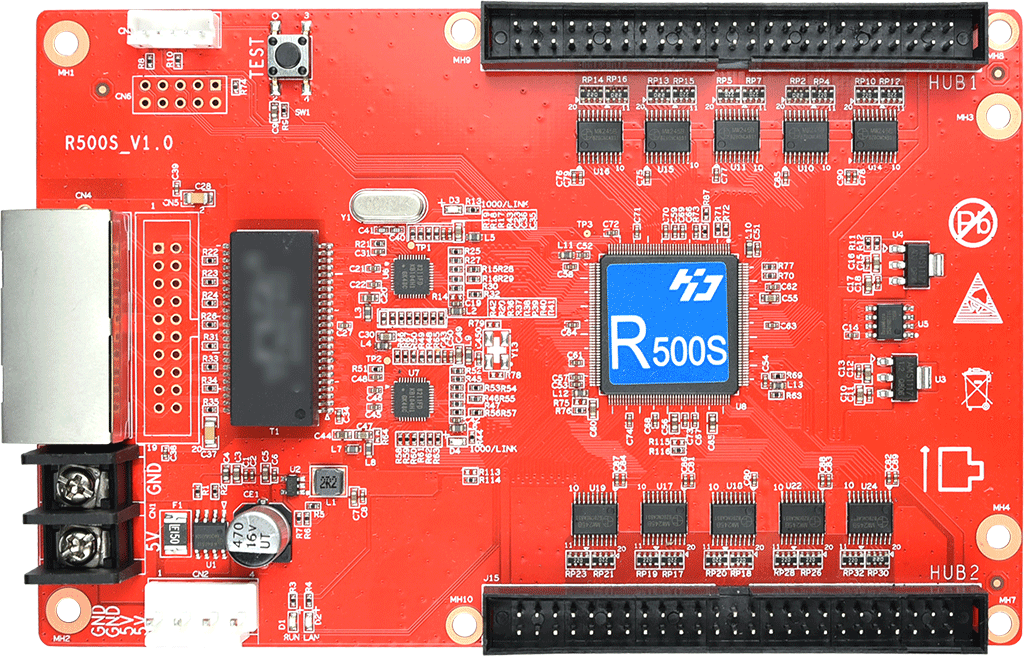 |  |  |  | |
| Loading capacity | 128*512 | 128*768 | 256*384 | 128*768 |
| HUB interface | 2×50PIN HUB | 2×120PIN HUB | 2×84PIN HUB | 4×26PIN HUB |
| Data output | 20 group of RGB | 32 group of parallel data or 64 group of serial data | 32 group of parallel data or64 group of serial data | 16/20/24 group of RGB |
| Scanning | Static~1/128 | Static~1/128 | Static~1/128 | Static~1/128 |
| Module construction | √ | √ | √ | √ |
| Extract rows/columns | √ | √ | √ | √ |
| Brightness correction | √ | √ | √ | √ |
| Arbitrary sor | √ | √ | √ | √ |
| Bright line control | √ | √ | √ | √ |
| Mapping | √ | √ | √ | √ |
General Configuration and Management
It’s not enough to merely get the screen to light up when you set up receiving cards. You also need to make sure that every part of the LED wall knows what to show and when. Each brand has its own setup tool: NovaLCT for Novastar, LEDVISION for Colorlight, HDPlayer for Huidu, and LEDStudio for Linsn. However, the methods are basically the same.
You start by connecting your control system directly through Ethernet or through the USB connection on a transmitting card. After connecting, the software lets you either scan or manually assign each receiving card to its spot on the screen grid. This arrangement shows the system how the signal should move from cabinet to cabinet and row to row.
After you make a map, you’ll upload a configuration file to each card. These files commonly end in .rcfgx, .rcfg, or .bin. The pixel width and height, the scan type (1/8 or 1/16), the RGB data sequence, and the brightness calibration are all important instructions in this file. The card can show the wrong section of the image or nothing at all without it. When you upload settings, they are stored in the card’s memory so it knows how to act even when the power goes out.
For more complicated installations, you’ll also need to change the gamma, gray levels, and color temperature to match other cabinets. This stage may also include automatically reading module information in systems that use smart modules. This saves time on setup. Using the right file version is vital. Don’t mix files between different card models or firmware versions, as this can cause issues or misalignment.
Most technicians run a test pattern, such red, green, and blue sweeps or grid lines, before going live to make sure that the pixel mapping and color order are right across the display.
Troubleshooting and Faults
If an LED screen starts acting up, the receiving card is usually one of the first things you should check, especially if the problem is only with one cabinet or row. It’s hard to ignore faults when they show up as missing parts of the screen, flickering panels, improper colors, ghosting effects, or modules that won’t light up at all. A loose data cable, a card that wasn’t stored correctly with configuration data, or a firmware mismatch that is silently disrupting communication are all common causes.
The first thing to do is look at the lights on the card itself. Most receiving cards contain a status LED that blinks in a certain way. No light? There might be a problem with your power. Flashing quickly and in an uneven pattern? The card might be getting a signal that is broken or doesn’t match.
From there, trace the data cable—look for broken clips, bent pins, or ports that are too loose. Changing the cable or using a known working card instead of the one you think is broken will help you figure out what’s wrong. If the card turns on but shows the wrong part of the video, there is probably a problem with the mapping in your setup program. If that’s the case, change the cabinet’s coordinates and upload the right receiver file again.
Other signs, such modules that are too dark, colors that change in unexpected ways, or signals that are delayed, can mean that there are problems with the firmware or the scan settings. It’s very important that the firmware version of the sending card and control software be the same as that of the receiving card.
Even little version differences can mess up pixel alignment or stop the card from reading smart module data. If a receiving card completely fails, replace it with the same model and load the saved configuration file from your backup right away. This brings back the pixel count, mapping, and electrical behavior. If you don’t do this, the new card will go back to factory settings, which won’t work with your screen.
Keeping extra cards, flat cables, and archived config files on hand is a great method to cut down on downtime and avoid having to call for emergency assistance. When you have problems with LED systems, you shouldn’t just guess. Instead, you should follow a set of steps: check the signal, test the hardware, double-check the settings, and get rid of one variable at a time.
Conclusion
Cards that receive signals may be buried in the cabinet, but they are what makes every LED panel work. If you know how to set up, manage, and fix problems with Linsn, Novastar, Colorlight, or Huidu cards, you can control the whole display system, from how accurate the colors are and how fast the refresh rates are to how quickly you can fix a problem when something goes wrong.
Knowing how to use receiving cards well not only saves you time, but it also keeps you from making expensive mistakes, cuts down on downtime, and makes sure your images look precisely how they’re supposed to. Make sure your receiving cards are set up correctly from the start if you’re buying an LED display.


 English
  Russian
  Spanish
  Arabic
  German
  Korean
  French
  Portuguese
  Italian
  Persian
  Indonesian
  Turkish